Standard APIs are an important tool for whoever consider interacting with Salesforce from an external application. There are different APIs for different purposes. The way they work may not be obvious for everyone that don’t know the details of the protocols used. The good news is that there are tools available to call the APIs to test it.
We can cite Workbench, for instance, that allows to make various calls from a web interface. As a local client, there is also Postman, an app that is made to create and send any kind of HTTP calls, possibly to the Salesforce APIs.
The even good news is that Salesforce provides a Postman collection to show us how they are used. A true gold mine to anyone interested in developing any app that would call one of the standard APIs.
Here, we’ll present the main features of Postman, and how to use the collection to learn how to make calls to the Salesforce standard APIs.
The wonderful world of Salesforce standard APIs
Salesforce provides a large set of APIs to allow calls from external applications (such as a company ERP or a IDE) to access Salesforce database. Depending on the type of information we want to access and the situation we’re in, we will call a different API to fulfill our need. For instance, a IDE client would call the Tooling API while a team that wants to insert a large amount of data would rather use the Bulk API. Here are some of the APIs available in Salesforce and their purpose:
- REST and SOAP: used to interact with the Salesforce database, using the corresponding protocols
- Bulk: used to insert or update record in mass, possibly using parallel processing of the data
- Streaming: allows to follow the modifications of records in near real-time using a publish-subscribe model
- Metadata and Tooling: used to interact with an org metadata, for deployment purpose (as the Metadata API) or to develop IDE tools (as the Tooling API)
- Chatter: allows to interact with the Chatter data in an org
As we can see, there are various possibilities to send requests to an org. The calls are not structured in the same way depending on the API in use. For instance, most calls will require an authentication from a user at some point. And the syntax of the request body (if body there is) can vary with the protocol. That is why it can be important to try different calls so that you can familiarize with the system. Postman is an app that allows to build highly customized requests. And send it to check the behavior of an app. Now, let’s see what it does and how we can use it to our advantage in our exploration of APIs.
Postman, the multi purpose API toolkit
Postman is a software that allows to create and send any kind of HTTP requests. It is widely used to simulate a client as well as to test APIs and Web Services. In the case of Salesforce, it is an interesting alternative to Workbench, as it requires you to make login calls as in any client application. Thus, it allows to simulate the behavior of a client in a more accurate and flexible way. Let’s dive more deeply into the features of this software by looking at its main interface:
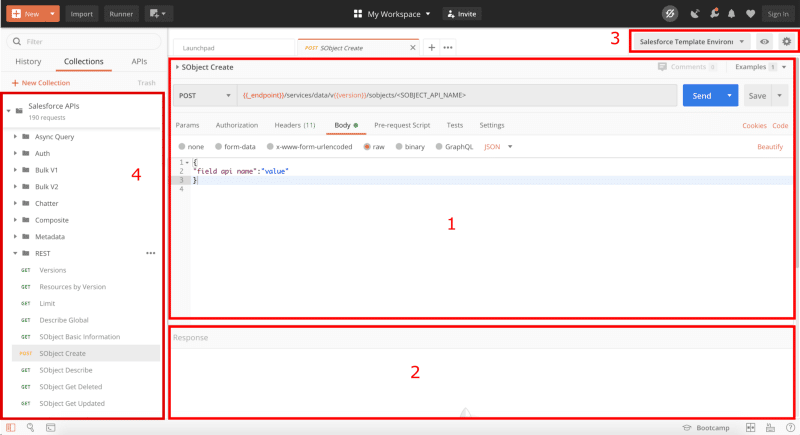
The four areas
We can distinguish different areas as seen in the picture:
- area 1: this corresponds to a request, where all the parameters can be set
- area 2: where the response appears after the request has been sent
- area 3: the environment management to store variables
- area 4: the list on the left contains the requests we saved in collections, as we will mention later
First, let’s mention the request builder in area 1. This part allows you to specify the HTTP verb of your request, the endpoint and all the parameters relevant to the request: URL parameters, authorization information, header and body of the request, for instance. For many of these, you have a intuitive interface to work with (for instance a list of key value pairs for the header parameters). But you can always access the raw version if you wish so. Below the “Send” button, you can generate code snippets in many languages, that would send the request you are working with.
In this part, you also have the possibility to code Javascript scripts that are run either before (Pre-request Script tab) or after (Test tab) the request is sent and the response is received. This, for instance, allows to explore the content of a response (by printing it in a console that you can find in the bottom left corner of the application). Or to use some of the response data to put it into an environment to be used later. This is useful to write test code for the response. And also proves very interesting when debugging a custom API, or when working with different requests that we want to get interacted.
Area 2
After sending the request, you have access to the response information in the area 2. With the header and body, as well as the test results, if you wrote any. You also have access to the size of the response and some information about the response time (and the time of the different parts of the response, as well, useful to evaluate a service performances).
Environments
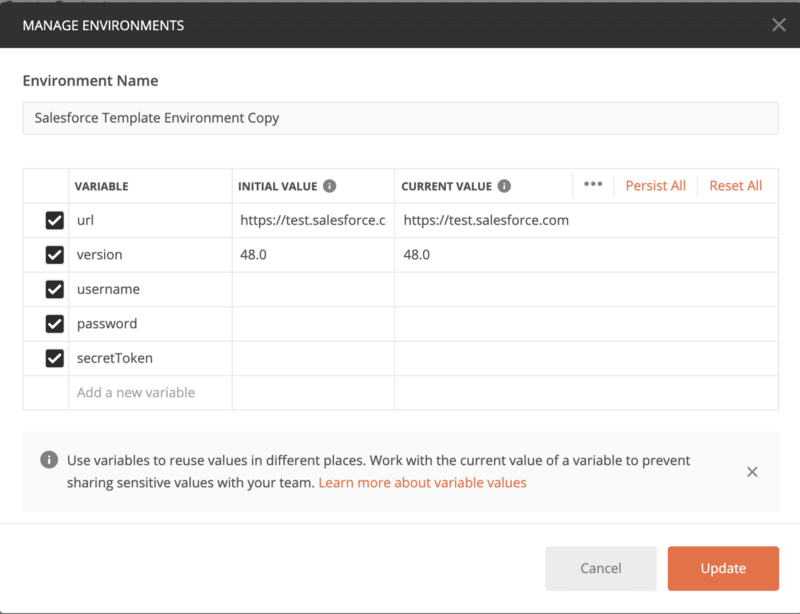
Another important Postman feature is the environment. Which can be managed in the area 3. This is an ensemble of variables that can be stored, modified and used in any request that works under this environment. For instance, this can be useful to store authentication variables such as a session Id, that would otherwise be stored in a variable in a client application.
Environment variables can be used anywhere in the requests (endpoint, header, body etc…) and can be created or changed in the Pre-request or Test scripts that ran with the requests. This is an interesting feature in relation to Salesforce is that it allows you to work with multiple orgs in parallel, which you can’t do that easily with Workbench, for example. Indeed, here you just need to setup several environment, one for each org you wish to request, and do a login once for each org. This fills the required identifications in the environments, and then you just need to change environment to change the org you are requesting.
While you can work in parallel with many requests, Postman makes possible to save and order them to be reused and shared with colleagues. A set of requests can be organized into folder, creating a collection of requests, as can be seen in area 4. Such a collection has been created and provided by Sebastien Colladon and Philippe Ozil, and it is a must see if you’re interested in having a deeper knowledge of the Salesforce APIs. Let’s see how we can use it.
The Salesforce Postman Collection
The Salesforce Postman Collection is a collection assembled to help developers use the Salesforce standard APIs by providing ready-to-use examples of requests. Nearly 200 different requests are available when this article is written, and this covers REST, SOAP as well as Metadata APIs and more. You can download the file in the GitHub page, that you can import in Postman as explained in the page, to use all the requests of the collection.
Now let’s dissect what happens in a typical set of requests taken right from the collection. We’ll try to create an account, using the REST API, and this goes in two steps: first, login to be authenticated, second, REST request to create the account as we want it.
Step 1: Login and authentication
The first step in communicating with Salesforce is authentication. Here we’ll login using the SOAP API but there are other ways to do it as well. In the Auth folder of the collection, let’s take a look at the body of the SOAP Login request.
<env:Envelope xmlns:xsd="http://www.w3.org/2001/XMLSchema"
              xmlns:xsi="http://www.w3.org/2001/XMLSchema-instance"
              xmlns:env="http://schemas.xmlsoap.org/soap/envelope/">
    <env:Body>
        <n1:login xmlns:n1="urn:partner.soap.sforce.com">
            <n1:username>{{username}}</n1:username>
            <n1:password>{{password}}{{secretToken}}</n1:password>
        </n1:login>
    </env:Body>
</env:Envelope>
As we can see, the request body mainly contains the username of the connecting user and the associated password + secret token combination. The syntax uses double curly bracket {{}} to reference environment variables, in any element of a request (endpoint, body etc…). To properly authenticate, we have to fill in these information (username, password and secret token) directly in the environment configuration (don’t forget to fill the “Current value” of the environment variables). Salesforce uses this information to generate an access token that will be used in the following requests as a session identification.
Test tab
The response also takes the form of a XML file, containing the URL of the org, some user information such as the username, role and profile, and a session Id that will be used to be recognized by the org as connected as the user. Looking at the Test tab in Postman, we can see the code that runs after receiving the response.
var result = xml2Json(pm.response.text())["soapenv:Envelope"] ["soapenv:Body"].loginResponse.result;
var url = result.serverUrl.split("/");
pm.environment.set("_accessToken", result.sessionId);
pm.environment.set("_endpoint", url[0] + "//" + url[2]);
pm.environment.set("_userId", result.userId);
pm.environment.set("_orgId", result.userInfo.organizationId);
The first line of the code parses the response body into a JSON string, which will be used in the following lines to set some environment variables such as _accessToken, which is a private variable (starting with an underscore _ by convention) containing the access token used in other requests. We can check in the environment that the new variables have been created with their corresponding values.
In this step, we used our Salesforce credentials to login to the org using the SOAP API and retrieve the access token that will be necessary in the next steps to be allowed to interact with the org. With this method, the username and password as well as the secret token must be filled directly in the environment. They will be used in the request body. This step must be repeated each time we need to connect to an org. And multiple environments can be used to connect in parallel to as many orgs. Note that the SOAP Login is only one of the ways to authenticate in Salesforce. There are other requests available in the collection that allows you to try different authorization flows.
Step 2: Request sending using the environment variables
Once the authentication has been made, we can send different requests using the same token. For instance, let’s create a simple Account. Note that the rules in term of read/write permission are those of the logged user (so you won’t be able to set a field if you don’t have both permissions). In the SObject Create request in the REST folder. We can see that the temporary variables _endpoint and _accessToken are used respectively in the endpoint and the header of the request. Note that you need to replace the last part of the endpoint with the API name of the object you wish to create. For instance to create an Account the correct endpoint to set is:
{{_endpoint}}/services/data/v{{version}}/sobjects/AccountThe body can be either in JSON or XML format for the REST API, here let’s send a JSON. This format is a list of key-value pairs. Therefore the key being the API name of the field and the value, its value. Let’s send a test account with the following body:
{
    "Name":"test"
}
This is enough to create an account. And the response we get after sending the request has the form of a JSON containing whether the creation was successful or not, if so, the Id of the created Account, and if not, the list of errors.
{
    "id": "0012X0000230mfcQAA",
    "success": true,
    "errors": []
}
Format of the response
Note that the format of the response can be switched between JSON and XML using the header parameter Accept: application/json to get a JSON response or Accept: application/xml to get an XML. Let’s observe what happens with an incorrect request and the Accept:application/xml parameter in the header:
<?xml version="1.0" encoding="UTF-8"?>
<Errors>
<Error>
<errorCode>INVALID_FIELD</errorCode>
<message>No such column 'FirstName' on sobject of type Account</message>
</Error>
</Errors>Here we can see that, beside the XML format, the request was incorrect (the status of the response is “400 Bad request”) and the body provides the reason of the failure (here, the fact that there is no FirstName field on the Account).
In this part, we used the access token retrieved before to interact with the Salesforce database with the REST API. Here we need to edit the request endpoint so it corresponds to the object we wish to create. Since it’s the REST API, we can use a JSON format and we need to specify the value of the different fields of the object. Note that the required fields absolutely need to be filled, otherwise you get an error message in the response. The other fields do not need to be specified for the request to succeed.
Reuse and customize the collection requests with the runner
Now we have seen several requests and how they work together. We can wrap them up in a new collection that we would assemble to create our own workflow. If you wish to automate a bit the sending of multiple requests in a collection instead of running them manually, it’s possible to chain requests together. First, there is a Javascript command that is worth mentioning to be used in the Test tab, postman.setNextRequest(“Request Name”);. This command allows you to set another request that will be sent right after the current one is over. But here we are going to use another tool, the Collection runner, that you can start with the button in the top right corner of the window.
If we elaborate on the previous example, we could wish to first create an Account, then a Contact that would be linked to the said Account, and all that in one action. This would be done the following way.
First, we create a new collection that will host the requests. Next, we copy the requests we need from the Salesforce collection into this new collection. Here we need the SOAP Login request, then twice the SObject Create. For the first SObject Create request, we need to change the endpoint to {{_endpoint}}/services/data/v{{version}}/sobjects/Account, and for the second one, {{_endpoint}}/services/data/v{{version}}/sobjects/Contact. The login request remains unchanged, as well as the body of the Account creation. In order to link the future contact to the future account, we need to keep track of the account Id, which is done by storing it into an environment variable with the following code in the Test tab:
var result = JSON.parse(pm.response.text());
pm.environment.set("_accountId", result.id);
AccountId field
Finally, the AccountId field in the Contact creation should be set, for instance with the following body:
{
    "Firstname":"testContact",
    "Lastname":"John",
    "AccountId":"{{_accountId}}"
}
Now, we can set the runner so all requests can be chained together. Let’s click on the runner button on the top left corner of the Postman window. This opens a window:
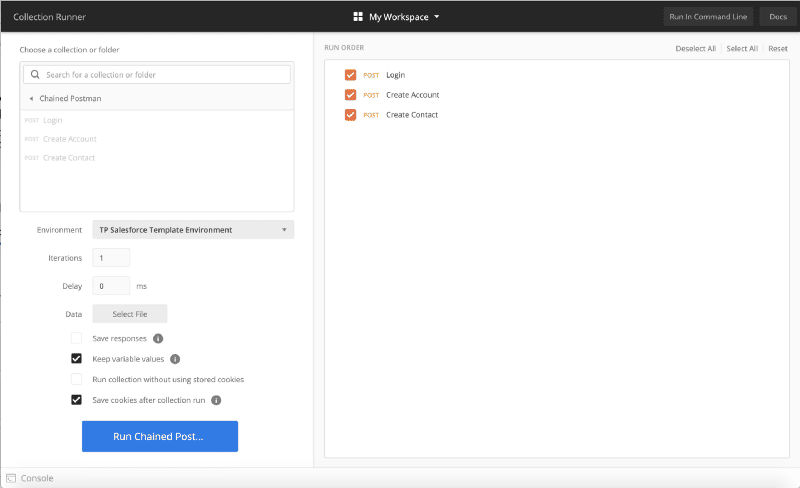
Here you can check/uncheck the requests you desire to include in the run and reorder them. You also have some interesting options such as the possibility to run the collection several times. With a delay between each, for instance. Don’t forget to set the environment you want to work in. When you’re ready you can run all requests at once by clicking on the button. This takes you to a windows that summaries all requests. Whether they succeeded or not and, again, you can take a look at the console to have more information in case you put some console.log() in the Test tab.
Here we saw how the collection runner allows you to chain the requests of a collection together. And create sets of requests that are bound together. So you can run automatically by the press of a button. This is also helpful to evaluate the performances of an application integration. Since it provides information about the time and size of the different request that compose the collection.
Summary
Standard APIs are a powerful way to communicate with Salesforce from a client. There is a large variety of them allowing to interact with both data and metadata in many different situations. Postman offers a very flexible way to test API by sending customized HTTP requests. And the Salesforce collection provides many examples of requests to experiment the different use cases of these APIs.
The first step usually is authentication. In which the use of environments allows us to work with multiple orgs in parallel. With one environment dedicated to each org. The login process returns all the information we need to send other requests, such as an object creation, for instance. Postman scripting allows us to add some test and interaction between the environment and the requests. Which we can use to automatically store variables from the responses.
Finally, the collection runner provides a nice way to automate the run of several requests that can be chained together. This can be helpful to analyze an API performance, for instance. Or to automate a task trough the API with and easy interface.
You can also test custom Webservices or REST Services using Postman. Even if you will have to create your own requests for that. Salesforce collection can always serve as an inspiration. You could create a collection as part of a documentation of your custom service, designed for an external client application.
Now you know how to use Postman to study and experiment the Salesforce APIs. You have an idea of all the possibilities this software offers when working in system integration. There are features we didn’t mention here. But you’re welcome to try! Play with it or go to the Postman learning center to discover what else you can do with it.
Resources
- The Git repository of the collection
- An article from Sebastien Colladon and Philippe Ozil
- A webinar about the collection
- The Postman Learning Center
- A Postman Cheatsheet
Want to learn more about Salesforce, check out our article Google to Salesforce integration step by step.