
Hello everyone, today we will continue our “Tips & Tricks” series. We will evoke a very painful point for me : TRANSLATIONS.
For everyone who has already worked on that, you know that is an endless journey to translate using Salesforce UI. It’s repetitive, it’s long and maybe boring.
So I’m going to share you a trick to go faster in the translation of custom labels using a Excel file and metadata file and a bit of SFDX.

STEP 1 — Generate a CSV template
Just before starting on this topic, I advise you to create all labels before translating them, it’s easier to update a file every time you create a new one, instead of trying to get all at the end of your tasks or project.
So we will see one of Excel template file you can use to do so.
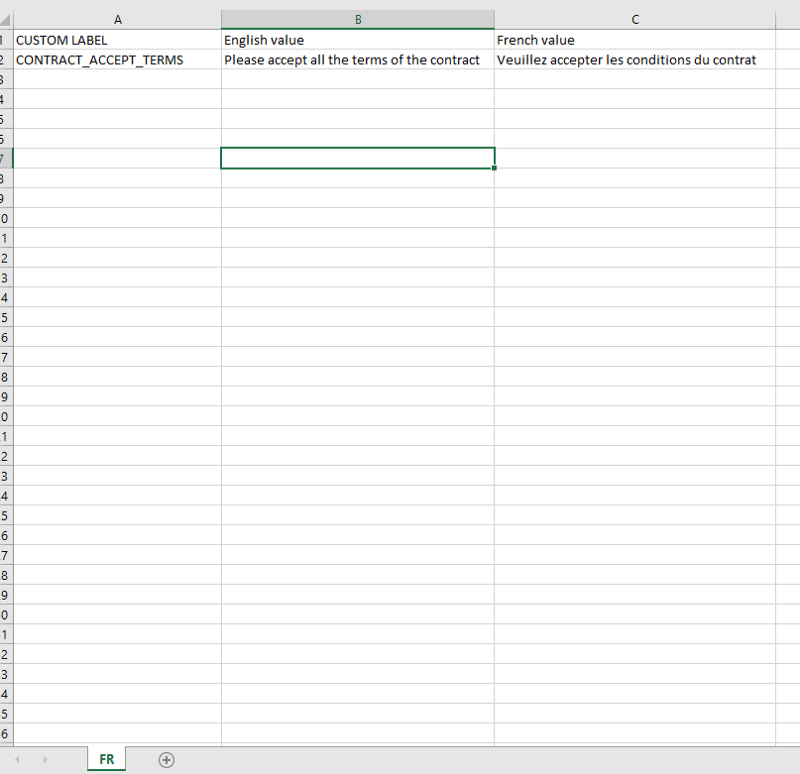
Let’s create 3 columns :
1— Custom Label Name :
Use it to store the custom label’s name.
I like to use this naming convention starting with the object name the label refers to, followed by if it’s a button or a checkbox label…, and give an explicit name, for example : CONTRACT_BUTTON_ACCEPT
2 — The native language value :
In my example I used English, it will be easier for the person who will translate and you can use this file as a unique repository for the English texts.
3 — The translated value :
Insert here the translated text.
First step is now completed and you are wondering how this can be uploaded to Salesforce.

STEP 2 — Convert to Salesforce language
This part will be, I think, the trickiest part. We are going to use the concatenation of two cells in Excel.
You can find here the link to the Office documentation about concatenating two cells.
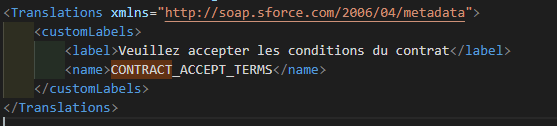
Our goal is to have something similar to this XML sample :
<customLabels>
<label>Veuillez accepter les conditions du contrat</label>                <name>CONTRACT_ACCEPT_TERMS</name>
</customLabels>
As you can see, where are using column 1 and 3 from our Excel file in our concatenation formula.
To reach that sample you have to use this formula for line 2 of our file : “<customLabels><label>” & C2 & “</label><name>” & A2 & “</name></customLabels>”
Copy the formula for all the lines concerned.
Step 2 is now completed, Good Job !

STEP 3 — Convert to Salesforce file
At this point we have all the data ready to be inserted in Salesforce.
Let’s create another file for Salesforce. The name has to be : languagecode.translation. For our example “fr.translation”.
Open your file and add this in your file :
<?xml version="1.0" encoding="UTF-8"?>
<Translations xmlns="http://soap.sforce.com/2006/04/metadata">
// INSERT YOUR CODE HERE
</Translations>
After that go back to your translation file and copy all the content of you column E and replace the “// INSERT YOUR CODE HERE” part with the content you just copied.
After that you should have something like this :
The file extension has to be .translation not .xml or .txt. For that verify that the file extension file is visible.
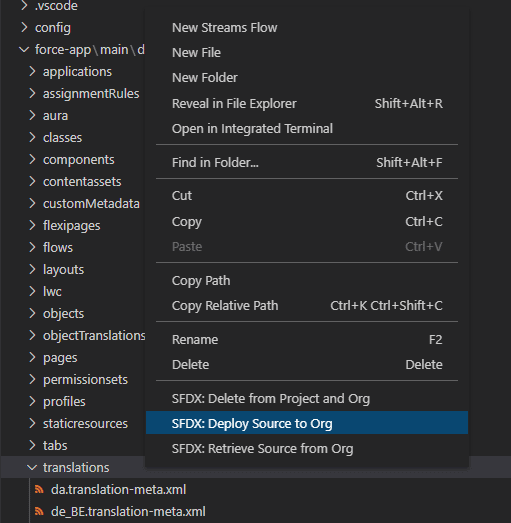
STEP 4 — Add translation file to metadata
Go to your project sources folder, by default it’s : “force-app\main\default”
Find the folder “translations”, if you don’t find it just create it.
Finally add the “fr.translation” in it.
And voila everything it’s ready, here we go to the last part !
STEP 5 — Deploy file to Salesforce
If you are using Visual Studio Code, you can use the SFDX: Deploy Source to Org.
Similarly, if you are using SFDX commands use : “sfdx force:source:deploy -p “path/to/translations” “.
To conclude !
I hope you enjoy this little trick. I really think it’s important to ask for the translations at the end of your development. If I have too resume why :
- Everything will be stored in one file.
- You can’t forget a custom label translation.
- It prevents to go “back-and-forth” with the translation team.
And if I have to summarize why you should use this method :
- Have you ever try to translate a lot of custom labels for different languages using the UI ?
- It’s time saving
At last, we are about to publish other articles concerning tips & tricks for your Salesforce use and if you don’t want to wait, you can go to our blog to see more content.
Follow us on LinkedIn here and on Twitter here.
Useful Links
- List of language codes for salesforce : here
- List of metadatas : here
- How to start with SFDX : here (blog Texei written by Lucile Bougeret-Incardona) and here (trailhead unit)