Since the Spring ’18, Second-Generation Packages can be installed in Production orgs. Three days after the release went out, we had our first DCP installed in Production. I’m very excited about this new tool, and thought it could be interesting to share our journey with it.
What is a Developer-Controlled Package ?
Except if you’ve been meditating in a cave for the last two years, you should have heard of Salesforce DX.
DX is standing for Developer Experience, bringing to Salesforce Developers a better and modern development flow.
From planning to releasing, DX is bringing you better tooling, and as deployment has always been a challenging part of Salesforce development. I was very curious and excited about the new features coming with Second-Generation Packaging.
Until now, we’ve been using ant through the Force.com Migration Tool, and from time to time Change Sets. I personally mostly never used managed or unmanaged package. The first thing to notice when looking at the new packaging options is that there are 2 package types :
Managed Packages are mostly used by ISVs, so we didn’t go down that road.
Developer Controlled Packages on the other hands, seems to be the perfect fit for Enterprise Customers that want to replace their Change Set/Ant tooling with a more robust solution. Looking deeper, DCPs comes in 2 flavors :
- Locked
- Unlocked
So what’s the difference ? Once installed, a Locked DCP won’t let you change the metadata, while Unlocked will just “flag” the metadata as being part of a Package, which content (code, fields, layouts…) will remain editable.
This will be interesting when trying to sort your “happy soup” of metadata, as explained in Dreamforce session How Everyone Can Leverage Salesforce DX Packaging.
We choose to use Unlocked DCP, because at the time of writing Locked DCPs are still in Pilot and can only be installed in Scratch Orgs and Sandboxes.
Moreover, having a Unlocked DCP installed means that we can still update our metadata, which seems a good backup plan in case we encounter any issue.
Selecting a project
Our goal is to move our entire codebase to Salesforce DX. We did some extended testing of DX using Git and Scratch Orgs. And when DCPs come out we felt like this was the opportunity to move to the next level : put our work in Production using the DX development model from end to end.
We had just started to work on an internal tool for the project team, which we quickly built on the Lightning Platform. This was the perfect project because :
- It was a brand new project (no package to build from existing metadata)
- It had no dependency at all with the existing projects on the org
- We (the project team) were the end users of this tool, so even if we broke something only us were impacted
Now we had chosen a project, we were ready to start our journey to DX and DCPs !
Creating a Package2
Using DX from the start was easier, as any metadata type currently supported by Salesforce DX can be in an unlocked package.
So we didn’t had to check the list of supported component types for Second-Generation Packages (though you can have a look, DCP already includes almost everything).
After a few days of development, we had a clean repo with all the metadata ready to be packaged. And that’s a big change between Change Set/Ant and DCPs :
You don’t start with an org from which you create/retrieve your package. You create it directly from your source code in your repo !
The first thing to do is create a Package2. You’ll need to have enabled your DevHub and Second-Generation Packaging, and logged in through the CLI.
If you’re not familiar with Salesforce DX, the related Trailhead trail is a very good start.
To create a Package2, just run the following line :
sfdx force:package2:create -n MyPackage -o Unlocked
This will give you a package id (starting with 0Ho) that you’ll need to add to your sfdx-project.json file :
{“path”: “force-app”,“default”: true,“id”: “0Ho…”,“versionName”: “v 1.0”,“versionDescription”: “v1.0”,“versionNumber”: “1.0.0.NEXT"}
Note the versionNumber attribute. Each time you’ll create a new version of your package, the NEXT keyword will automatically increment the build number to the next available for the package. This is pretty convenient.
Now that your Package2 is created, let’s create a Package2 Version from your code !
Creating a Package2 Version
Just run the following line :
sfdx force:package2:version:create -i 0Ho… -d force-app -k mySuperSecretKey
Your Package2 Version will be enqueued for creation, and then you’ll be able to run another command to get the status (don’t worry, you’ll get this command line as an output of the previous one, so you’ll just have to copy paste, you lazy developer :P) :
sfdx force:package2:version:get -i 05i…
Let’s stop for a second and add a few notes on what we’ve done.
I’ve been using the short version of the flags on the command line, because it’s faster to write.
Then I’m used to them, but I could have written the same command with more explicit flag names :
sfdx force:package2:version:create --package2id 0Ho… --directory force-app --installationkey mySuperSecretKey
You can get help on all CLI commands using -h on them, so running the following will get you all the flags you can use, both in their short and long version :
sfdx force:package2:version:create -h
package2id and directory should have the same values as the ones you’ve added to your sfdx-project.json file under “id” and “path”.
All the source code that you have under this path will be used to create the DCP. That’s right, coming from your local code, not from an org !
Another cool stuff : You won’t have to write a package.xml manifest. Second-Generation Packaging is clever enough to understand what metadata is in the folder (finally!).
One last thing to note is the installation key. What’s that ?
Well, something that wasn’t obvious for me when I started playing with DCPs is that they are public. That’s right. Well, you need to know the package id to install it, but still.
That may be obvious for you if you’ve been using managed/unmanaged packages before, but when I started using DCP I was thinking something like DCP=Change Set/Force.com Migration Tool V2.
Your Change Sets can only be installed in the Production org from which the Sandbox was created, and your ant packages are usually stored locally.
DCPs are like managed/unmanaged packages. You can install them via an url (more about this in a second). So you’ll really want to set an installation key if it’s not a open source project.
Hopefully you’ll set a more secure installation key in your packages. :)
Installing a Package 2 Version
The first way to install a Package2 Version is to simply use an url, like you would do for any existing package :
https://login.salesforce.com/packaging/installPackage.apexp?p0=04t…
In case you forget the url format, it’s also available through the command line if you list your packages :
sfdx force:package2:version:list
The other option, that you’ll want to use if you automate your deployments, is to install them through a CLI command :
sfdx force:package:install -i 04t…
Note that this command is using the “package” keyword and not “package2” : the install process is the same for all types of packages.
Same as for package2 creation, you’ll be able to query the status of the installation :
sfdx force:package:install:get -i 04t…
That’s it…for installing a package in Scratch Org or Sandbox !
Production require one additional step.
Installing a DCP in Production
Once you’ve written your code, created Package2 Versions, tested everything at that you’re ready to go to Production, you’ll need to update the version to set it as released.
The thing is that in a development lifecycle, you’ll likely create several (hundreds ?) of Package 2 Versions before being ready to go to Production. Once you’re there, you don’t want to install one of your beta package by mistake.
Setting a package as released is an easy step :
sfdx force:package2:version:update -i 05i... -s
Note that this time you’ll need the Package2 Id starting by 05i (when you create your package version you’ll get 2 Ids, a Package 2 Version Id (starting by 05i) and a Subscriber Package 2 Version Id (starting by 04t)).
Don’t worry, you can get all the Ids doing sfdx force:package2:version:list, and every time you’ll do a -h on a command you’ll be told which Id to use.
Once your Package2 Version is set as released, you’ll be able to deploy in Production, and voila !
One last thing you’ll need to do is update you sfdx-project.json file. You can only have one released package per version number (1.0, 1.1…).
So just increase the minor version number by one :
{“path”: “force-app”,“default”: true,“id”: “0Ho…”,“versionName”: “v 1.1”,“versionDescription”: “v1.1”,“versionNumber”: “1.1.0.NEXT"}
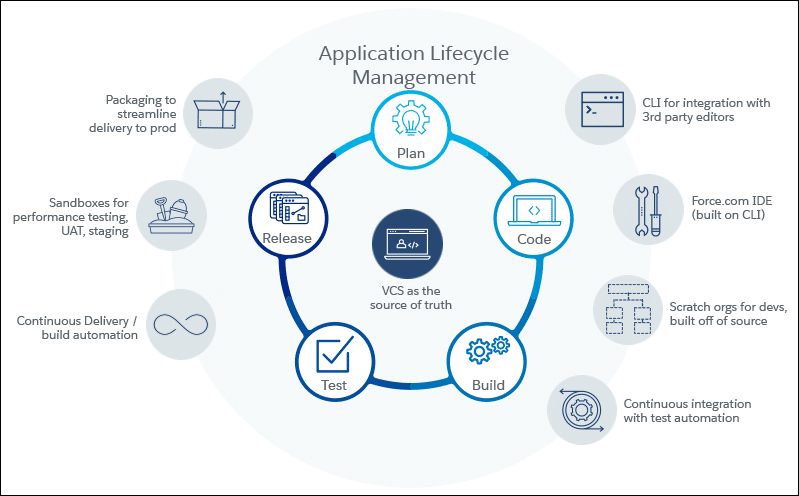
Using Second-Generation Packages in an ALM process
After creating and deploying our first versions manually using the command line, we then integrated it in our ALM process.
A few tips related to this :
- Unlike metadata deployments, test are not run on package installation, run them (using force:apex:test:run)
- Don’t use short flag names, using long ones will make it easier to understand for someone else
- Remove prompts for command lines that ask for confirmation. For instance, use the “noprompt” flag when you release a Package2Version
- Use additional flags so that you don’t have to poll to get the status of your package (“wait” for force:package2:version:create, “wait” and “publishwait” for force:install:package)
- All commands can make use of a “json” parameter, nifty to parse the result in your ALM tool
- Once created, there isn’t an easy to see your package content. Use the “tag” flag to trace the build number linked to your Package2
This will give you commands like this for package creation
sfdx force:package2:version:create --directory force-app --package2id 0Ho… --tag 42 --installationkey mySuperSecretKey --wait 30 --json
and installation
sfdx force:package:install --id 04t --installationkey mySuperSecretKey --targetusername myOrg --publishwait 30 --wait 30
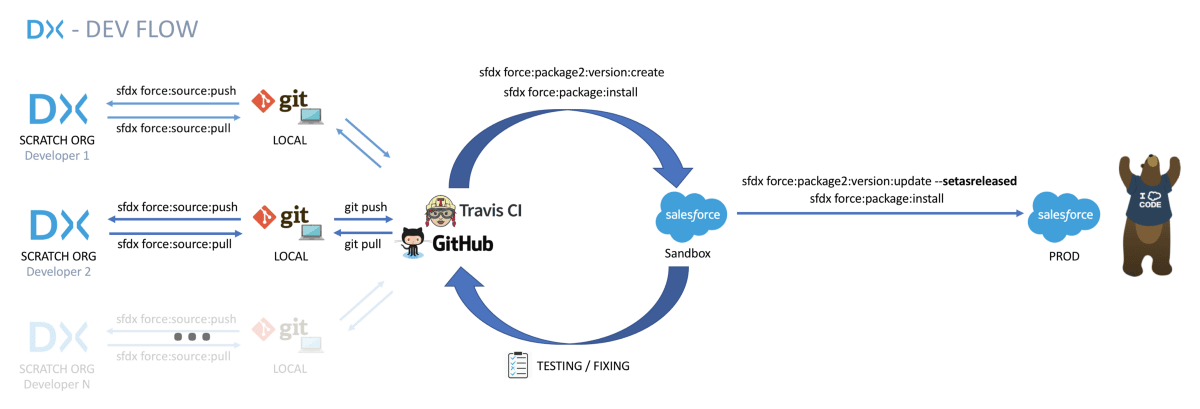
Development Flow
At the end, we now have a pretty smooth development flow where every developer code “locally” on a Scratch Org, push and merge to the repo when they’re ready.
Then the ALM process takes care of everything for us :
That’s it ! Should you have any question, please feel free to ask them in the comments or reach out to me on Twitter : @FabienTaillon.
Update
Salesforce just released a Trailhead Module and a Quick Start on Unlocked Packages. Seems a good start for everyone curious about DCPs :
Note : In Summer ’18, some CLI commands used for Second Generation Packages did changed, but the whole idea remains the same. You can have a look here to see the list of what has changed.