
Have you ever needed to quickly create a web form that you would integrate to a company website, and send the submissions to Salesforce to be turned into specific objects ?
Sure, Web-to-Lead or Web-to-Case are nice standard solutions but they have their limits, mostly that they are limited to the Lead and Case objects respectively.
You could also work out a full custom solution. For instance using the standard APIs provided by the platform. It would be more flexible but requires some amount of coding that you could not be comfortable spending time to.
123FormBuilder is a midway alternative that allows you to create custom forms using a large range of configuration tools and map it directly to objects and fields in your Salesforce organization. All this using drag & drop configuration, which makes it easy and quick to handle, it could well be the solution you are looking for.
What is 123FormBuilder ?
123FormBuilder is an Appexchange app that allows you to quickly generate custom web forms and directly link them to your Salesforce org to turn it into your favorite objects (say, a Contact or a custom object). You can then integrate the form in a website. It will create an end-to-end communication with your org . All this is made using drag and drop customization, which makes the use of it both simple and fast to use at the same time.
The editor of this app also proposes different kind of products involving an easy way to build online forms, that can be integrated with many systems such as Google Drive, Paypal, or in our case of interest, Salesforce.
123FormBuilder for Salesforce is a payed app, that will cost you about 85$ per month and per user to access this solution. However, you don’t need as many licenses as you have users in your org, but only for the users that will configure the forms.
After you installed it, you can get your solution ready in mainly two steps :
- First, create the web form using the drag-and-drop editor (that offers different fields and also nice features such as field constraints).
- And second, map those newly created fields to the Salesforce sObjects of your choice. The submissions that will be made to the form in your website will automatically be converted into the objects according to the mapping you defined without you needing to write any code.
Let’s detail these two steps using a simple made-up example that we will use for illustration purposes. Say you are a transport vehicle company and you want to let your potential customers ask for information about one of your product :
For example bike, car, plane, and maybe in the future you would expand your activity to sell space rockets.
First, you would like to get your customer some personal information (such as their name, address) and the content of the request.
Then you could want to turn these requests into Leads (for the sake of the example, say you really can’t use Web-to-Lead) with your fields correctly mapped. You also could like an attachment to let your potential customer add a document, like a driving license (you wouldn’t encourage risky behaviors for your customers, would you ?).
And also create a task to remind a representative in Salesforce to call the contact. Now let’s detail the steps to achieve that using 123FormBuilder.
Step 1 : create the form
First, let’s start with creating our web form.
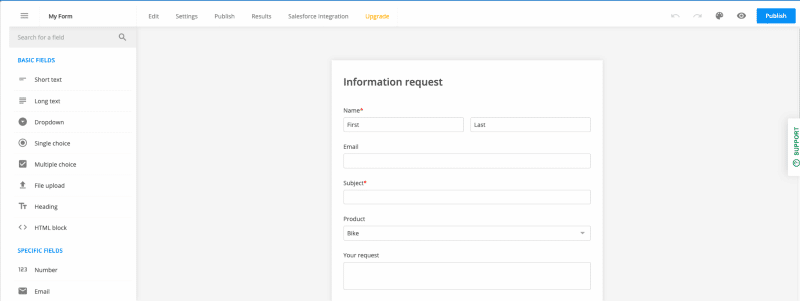
Your can start from scratch or use one of the available templates. In the form editor panel, you can drag and drop the fields you want to display among a vast choice of fields, such as text, picklist, checkbox, date, email, phone and many more. You can also add more complex fields, such as address, or file upload.
For our example, let’s add the coordinates of our customer (Name, email, and address, because why not), the type of product he/she wants to ask about as well as the content of the request and and upload field for the attachment.
Beside the basic options such as changing the label of the field or setting a default value, the form editor provides a set of customizations for field validation.
For example set a min or max number of character, choose only numeric or alpha characters or ensure the value matches a regular expression. There are also options specific for many types of fields, like the format of an address field or the accepted types of files for the upload field. This allows you to define a set of requirements necessary for the submission of your form, that control the quality of your data on the client side before the form is even submitted.
Once the form is all set, you can embed it in your website using a piece of code provided in the 123FormBuilder UI and that you can directly include in your code.
The form is hosted in the 123FormBuilder servers, so whenever you load the page where your form is embedded, a connection is made to the servers to retrieve it.
The advantage is, each time you change something to your form (change a label, a validation or add or remove a field), it will always be updated in real time in your website without needing to deploy anything.
Step 2 : map your form to sObjects
Once you set your form with every fields you want the user to fill, it’s time to define the behavior of 123FormBuilder when a submission is made.
This happens in the Salesforce Integration panel, where you can choose between the different objects of your org (standard as well as custom) that will be created after a submission of the web form.
You will be asked to choose one or several primary objects, and you will also be given the possibility of adding related (children) records to the objects you already defined, if applicable (you can’t add a child record if there is no child relationship on that object).
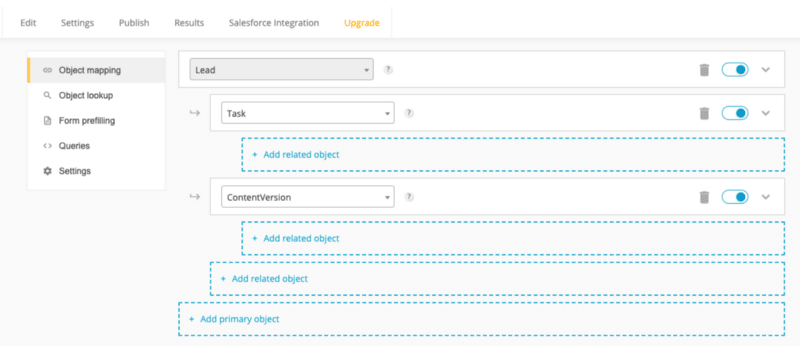
In our example, we could set a primary Lead and define two children objects, one for the Task and one for the attachment (using the ContentVersion object). You are not limited to the number direct children of your primary objects, and can add a related record to the related record, up to 5 levels of deepness from the primary record (meaning, a primary object can be at a maximum of 5 levels above any other object in your object hierarchy, the same way you can’t query more than five levels of child-to-parent relationships in SOQL).
Again, the definition of these objects is made through drag-and-drop interaction, as can be seen in the figure 2. You have a nice interface where you can see clearly and move the objects, as well as deactivating it if needed.
For each object, you then need to define the record type and the field values.
Clicking an object opens its configuration panel, as shown in figure 3.
At first you need to define the record type, which will determine the available fields based on page layout : if a field is required or hidden in the layout associated to the record type you chose, it will not appear in the list of fields you can set.
You will also have the possibility to choose the type of action you want to perform (either create or update records), and define either you want the record to be created at each submission or only when fulfilling some conditions (like the value of a field).
The next step is to map the fields of you objects with the fields of your form. The lower part of the object panel allows you to set a value for each field of the record that will be created.
As mentioned above, you will only have access to the fields visible in the layout associated to the record type you chose. To fill the fields, you can use either a field of your web form, a constant value or a custom value that can be defined using several field values.
As you can see in figure 3, we mapped the personal information of the customer to the appropriate fields in the Lead.

In figure 3, you can see that the Owner Id of the created Lead will be filled with something called a Query result that we didn’t mention yet.
Query fields and lookup fields are two ways that you can retrieve some data from your Salesforce org to include them into your field mapping. To define lookup fields, you need to specify the kind of object you desire, some filters (that can be defined using some form information) as well as the fields to retrieve.
You will then have the option to use one of these fields, for example in the field mapping. The query fields are quite similar, except here you define directly the query that you want to be sent to Salesforce. You will have the same option than for the lookup fields to use the query fields in your form mapping.
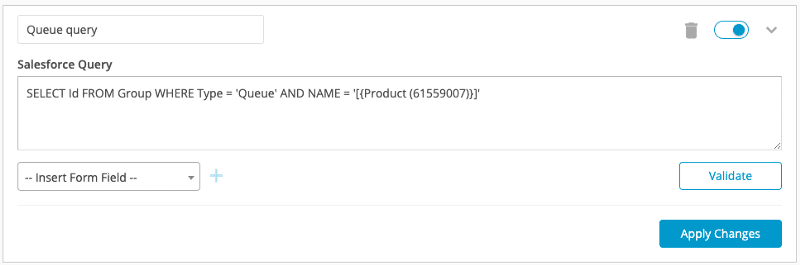
In our example, we defined a query that you can see in figure 4, that retrieves a queue associated with the type of product the customer is interested in (the “product” field). We use its Id to set the Lead owner (as you can see in figure 3).
Of course in this case, you could use lead assignment rules, but this is mainly for the illustration. It could work for any object, and be dependent on many different factors.
Here it is, you have your pretty form and you were able to map it correctly to a Salesforce object, and you didn’t have to write a single line of code (except maybe a query). You can view the form directly in the Salesforce interface, or embedded in your website.
If you try to fill it and send a submission, you can check into Salesforce that the objects were created as you defined them.
Here we talked about the main features of the 123FormBuilder solution, that consist in the two steps :
- 1. construction of the form and
- 2. configuration and mapping of the objects and fields.
However, there are additional features offered by the app that could be of great use in some cases. Let’s now cite a few of them.
Other cool features we didn’t mention
These features are like side dishes of your main course : you don’t necessarily need them to make the machine work, but they are still welcome.
First, we didn’t mention the possibility to add a verification mechanism such as a Captcha in the form before submitting it, or a thank you page that would appear after the submission and has many customizations available.
Here are some other option that could be useful :
- Translation : you can easily set up translations for the labels of your form fields for different languages.
- Rules : you can show or hide fields using a defined condition. In our example, say, you can show the field to join a document only if the product is equal to the value “Car”.
- Submission history : the list of the submissions made to a given form can be accessible directly in the interface in Salesforce, where you can see the state of the form when submitted. Handy when you want to make reports or identify a specific use of your forms.
- Form prefilling : you can make the form fields filled at the loading of the form or when the user starts to type using data from Salesforce that are retrieved with an object lookup. This can be used as suggestions to help your users
This is a non exhaustive list. There is also the possibility, among other things, to include external applications or a payment mode to your form, but this you could discover by trying the solution.
Some technical point to raise
As mentioned above, the form as well as the configuration you defined are hosted on the 123FormBuilder servers, even if you can access it from the Salesforce UI. The form is retrieved from the hosting servers when you load the page, and the information is sent there when you submit it.
What happens afterward is actually a set of calls to the standard Salesforce APIs to your org to make the appropriate changes in the database.
Said in another way, there is a part in the link between your website and your org on which you have no control. You are dependent on the state of the servers, and this might not be fit for everyone. In particular it will be difficult for you to debug anything that happens in the 123FormBuilder servers, hence to identify if there is something wrong on this side.
This point is not necessarily an issue depending on the use case, but it’s worth knowing if you are considering to use 123FormBuilder for a project.
Summary
123FormBuilder is an interesting tool to build your online forms and integrate their submission into Salesforce quickly and easily.
It provides with an easy to use drag-and-drop solution to make a link between a website and your org that can save you quite some time. You can produce your forms using a large variety of field types that makes the solution relevant to many different use cases.
The solution comes with some imperfections, like the dependence on a third-party app that can be a problem if you need full control over your process. But if what you need is a quick way to create a form that you would integrate in a website and that would be converted into Salesforce objects directly in your org, 123FormBuilder could well be the answer to your problem.